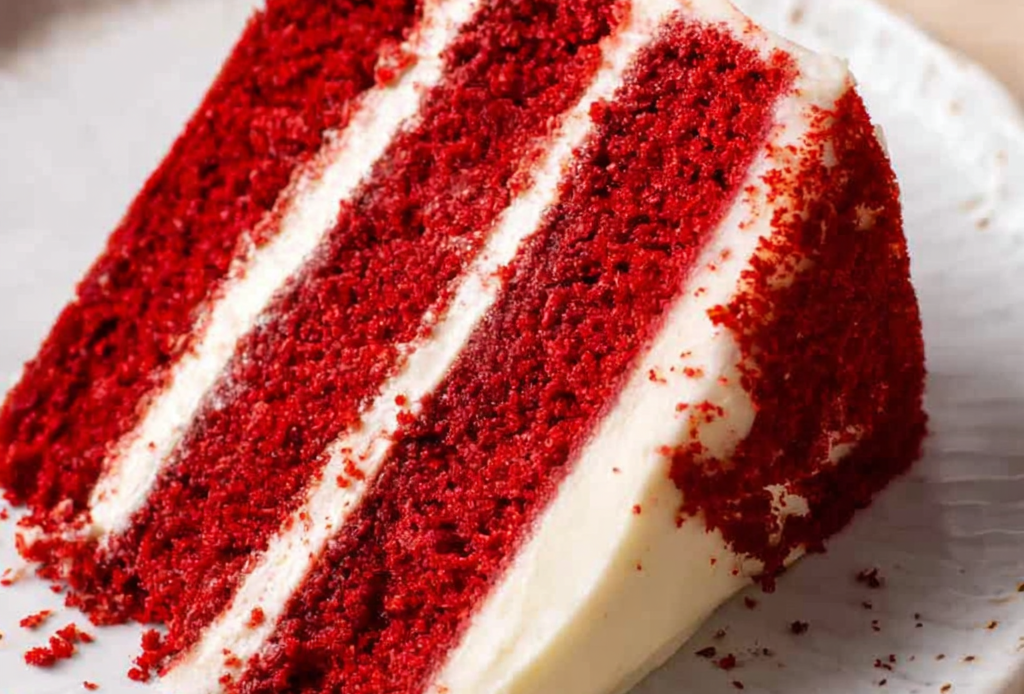
My First Bite of Red Velvet Magic
I saw that red slice at a church potluck. It looked like a velvet dress. The cream cheese frosting was piled high. I took one bite and was hooked. The cake was so soft and mild. The tangy frosting made it perfect. I knew I had to learn this recipe. Ever wondered how you could turn Red Velvet Layer Cake with Cream Cheese Frosting into something unforgettable? It starts with that first sweet, tangy taste.
My Kitchen Disaster Turned Lesson
My first try was a funny mess. I used too much red food coloring. My hands looked like a doctor’s after surgery. The cake layers came out a shocking crimson. But the flavor was still wonderfully rich. That mess taught me a good lesson. Home cooking is about joy, not perfection. A lopsided cake made with love still tastes amazing. It is the effort that truly matters.
Why This Cake Tastes So Special
Two things make this cake stand out. First, the cocoa is mild, not strong chocolate. It lets the other flavors shine through. Second, the buttermilk makes the crumb super tender. It also adds a slight tang. That tang pairs perfectly with the rich frosting. Which flavor combo surprises you most, the cocoa and buttermilk or the cake and tangy frosting? Tell me your thoughts below.
A Slice of Sweet History
This cake has roots in the American South. It became famous in the 1900s. A company sold red food coloring for baking. They shared the recipe to help sales. The cake was a fancy treat for special events. *Did you know the original red color came from beet juice?* That was before food coloring was common. Now it is a beloved classic everywhere. Do you have a family memory tied to this cake? Share your story with me.

Ingredients:
| Ingredient | Amount | Notes |
|---|---|---|
| All-purpose flour | 2 ½ cups | |
| Unsweetened cocoa powder | 2 tablespoons | |
| Baking soda | 1 teaspoon | |
| Salt | ½ teaspoon | |
| Unsalted butter | ½ cup | Softened |
| Vegetable oil | 1 ½ cups | |
| Granulated sugar | 2 cups | |
| Large eggs | 2 | Room temperature |
| Vanilla extract | 1 teaspoon | |
| White vinegar | 1 teaspoon | |
| Red food coloring | 1 ounce | Liquid or gel |
| Buttermilk | 1 cup | Room temperature |
| Cream cheese | 16 oz | Softened |
| Unsalted butter (for frosting) | 1 cup | Softened |
| Powdered sugar | 4 cups | |
| Vanilla extract (for frosting) | 1 teaspoon | |
| Salt (for frosting) | Pinch |
How to Make a Classic Red Velvet Cake
Let’s bake a stunning red velvet cake. This recipe creates a moist, tender crumb. The cream cheese frosting is perfectly tangy. Follow these steps for a beautiful dessert.
Step 1 Preheat your oven to 350 degrees Fahrenheit. Grease and flour two nine-inch cake pans. Whisk the dry ingredients in a medium bowl. This includes flour, cocoa, baking soda, and salt. Step 2 Cream the butter, oil, and sugar until fluffy. Beat in the eggs one at a time. Mix in the vanilla, vinegar, and food coloring. (Hard-learned tip: Use gel food coloring for a richer red). Step 3 Add the dry ingredients and buttermilk alternately. Start and end with the dry mixture. Mix just until the batter is smooth. Overmixing can make your cake tough. Step 4 Divide the batter evenly between your pans. Bake for 30 to 35 minutes. A toothpick should come out clean. Cool cakes in their pans for ten minutes. Step 5 Make the frosting while cakes cool. Beat the cream cheese and butter together. Gradually add powdered sugar, vanilla, and salt. Whip until it is light and spreadable. What ingredient gives red velvet cake its unique tang? Share below! Cook Time: 35 minutes Total Time: 1 hour 30 minutes Yield: 12 servings Category: Dessert, CakeThree Fun Twists on the Classic
Love the original? Try one of these fun spins next time. They add a little surprise to every slice. Each version brings its own special charm to the table.
Chocolate Chip Red Velvet Peppermint Frosting Mini Layer CakesFold a cup of mini chocolate chips into the batter. Use peppermint extract in the frosting instead of vanilla. Bake the batter in cupcake tins for single servings.
Which creative spin would you try first? Vote in the comments!Serving Your Beautiful Cake
This cake is a star all on its own. A few extras can make it even better. Think about texture and flavor when you choose.
Serve each slice with fresh berries on the side. A sprinkle of chopped pecans adds a nice crunch. For a drink, try cold milk or a cup of coffee. A glass of dessert wine also pairs wonderfully.
Which would you choose tonight, a glass of milk or a cup of coffee?
Keeping Your Cake Fresh
Store leftover cake in the fridge. Cover it well to keep the frosting firm. It will stay fresh for up to four days. You can also freeze the cake for later. Wrap slices tightly in plastic wrap first. Thaw them overnight in your refrigerator. A quick room-temperature rest makes it taste best. My grandkids love finding a slice waiting for them.
Simple Cake Troubleshooting
Is your cake dry? You may have over-baked it. Check it a few minutes early next time. Is the color not vibrant enough? Gel food coloring works much better than liquid. Is your frosting too runny? Your cream cheese was likely too warm. Chill the bowl and beaters for ten minutes. This matters because texture affects your whole experience.
Your Red Velvet Questions
Can I make this cake gluten-free? Yes, use a quality gluten-free flour blend. Replace the regular flour measure for measure.
How far ahead can I bake the layers? Bake them up to two days early. Wrap and store them at room temperature.
What can I use instead of buttermilk? Mix one cup milk with one tablespoon vinegar. Let it sit for five minutes before using.
Can I make this into cupcakes? Absolutely, fill liners two-thirds full. Bake for about 20 minutes instead.
Can I halve this recipe? You can, for a smaller cake. Just use six-inch cake pans. What other swaps are you curious about?
Happy Baking from My Kitchen
I hope this cake brings you joy. Baking is about sharing love with others. Seeing your creations makes my day. Please share your beautiful results with everyone.
Tag Savory Discovery on Pinterest with your photos.


Red Velvet Layer Cake with Cream Cheese Frosting
Description
A classic, stunning dessert with moist, vibrant red layers and a rich, tangy cream cheese frosting.
Ingredients
For the Frosting:
Instructions
- Preheat your oven to 350 degrees Fahrenheit. Grease and flour two nine-inch cake pans.
- In a medium bowl, whisk together the flour, cocoa powder, baking soda, and salt.
- In a large bowl, cream the softened butter, vegetable oil, and granulated sugar together until light and fluffy. Beat in the eggs one at a time. Mix in the vanilla extract, white vinegar, and red food coloring.
- Add the dry ingredients and the buttermilk to the wet ingredients alternately, beginning and ending with the dry ingredients. Mix just until the batter is smooth and combined.
- Divide the batter evenly between the prepared pans. Bake for 30 to 35 minutes, or until a toothpick inserted into the center comes out clean.
- Let the cakes cool in their pans for 10 minutes before turning them out onto a wire rack to cool completely.
- For the frosting, beat the softened cream cheese and butter together until smooth. Gradually add the powdered sugar, vanilla extract, and pinch of salt. Whip until the frosting is light and spreadable.
- Once the cakes are completely cool, frost and assemble the layers.
Notes
- Ensure all ingredients are at room temperature for a smooth batter and frosting. For best results, let the frosted cake set in the refrigerator for an hour before slicing.


