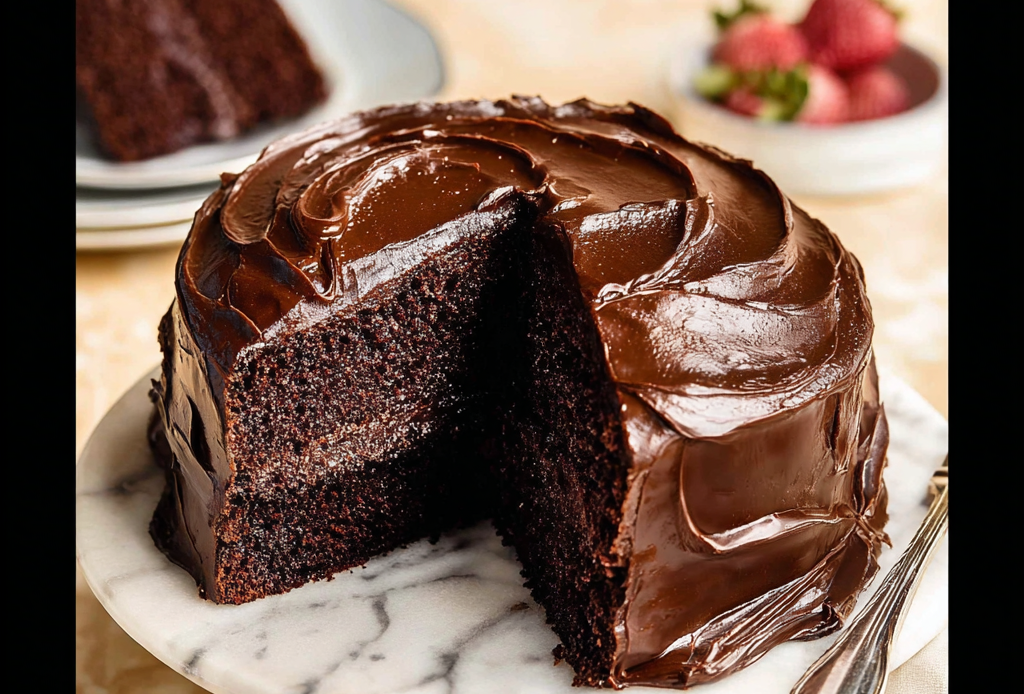
The Cake That Stole My Heart
I first saw this cake at a friend’s book club. It looked dark and rich. The smell of chocolate filled the whole room. One bite made me feel like a happy kid again. It was pure, sweet comfort on a plate. Ever wondered how to make a moment truly magical? This cake is my answer. It turns any Tuesday into a small celebration. I knew I had to learn to bake it myself.
My First Baking Adventure
My first try was a little messy. I was so excited. I accidentally used salted butter in the frosting. It tasted a bit strange at first. But my family still ate every last crumb. They loved it anyway. That’s the real magic of home cooking, isn’t it? It’s not about being perfect. It’s about the love you stir into the bowl. A small mistake never ruins the shared joy.
Why It Tastes So Good
Let’s talk about what makes this cake special. The coffee in the batter is a secret. You don’t taste coffee, just deeper chocolate flavor. The frosting is creamy and not too sweet. It balances the dark cake layers perfectly. Which flavor combo surprises you most: coffee and chocolate or sweet and bitter? Tell me in the comments below. I read every one.
A Slice of Storybook History
This cake is inspired by a famous movie scene. It comes from the 1996 film “Matilda.” In it, a boy is forced to eat a giant chocolate cake. The scene is both funny and unforgettable. It made us all crave that fictional dessert. Bakers have been creating their own versions ever since. *Did you know the actor really ate chocolate frosting for that scene?* He said it made him feel pretty sick. So, our homemade version is definitely the better way to enjoy it. Will you bake yours this weekend?

Ingredients:
| Ingredient | Amount | Notes |
|---|---|---|
| All-purpose flour | 2 cups | |
| Granulated sugar | 2 cups | |
| Unsweetened cocoa powder | ¾ cup | |
| Baking powder | 2 tsp | |
| Baking soda | 1 ½ tsp | |
| Salt | 1 tsp | |
| Espresso powder | 1 tsp | Optional |
| Milk | 1 cup | |
| Vegetable oil | ½ cup | |
| Large eggs | 2 | |
| Vanilla extract | 2 tsp | |
| Boiling water | 1 cup | |
| Unsalted butter | 1 ½ cups | Softened |
| Powdered sugar | 5-6 cups | |
| Unsweetened cocoa powder | 1 cup | |
| Milk or heavy cream | ¼ cup | Or as needed |
| Vanilla extract | 2 tsp | |
| Salt | ¼ tsp |
How to Bake the Ultimate Chocolate Layer Cake
This cake is pure magic. It is rich, moist, and deeply chocolatey. Let’s get baking. First, heat your oven to 350 degrees. Grease and flour two nine-inch cake pans. This simple step prevents sticking.
Step 1 Mix your dry ingredients in a big bowl. Combine flour, sugar, cocoa, baking powder, and soda. Add the salt and espresso powder too. The espresso makes the chocolate taste stronger. Step 2 Now mix the wet ingredients in another bowl. Add milk, oil, eggs, and vanilla. Whisk them together until smooth. Pour this into your dry ingredients. Stir just until combined. Step 3 Carefully stir in the boiling water. The batter will be very thin. That is perfectly normal, I promise. (Hard-learned tip: Use a whisk for the hot water. It blends smoothly without lumps). Step 4 Pour the batter evenly into your pans. Bake for 30 to 35 minutes. A toothpick should come out clean. Let the cakes cool completely in the pans. Step 5 Make the frosting while the cakes cool. Beat the soft butter until creamy. Slowly add powdered sugar and cocoa. Mix in vanilla, salt, and a little milk. Whip it until fluffy and spreadable. Step 6 Place one cake layer on a plate. Spread a thick layer of frosting on top. Gently set the second layer on it. Frost the top and sides of the whole cake. Now slice and enjoy your masterpiece. What is the secret to an extra-moist chocolate cake? Share below! Cook Time: 35 minutes Total Time: 1 hour 15 minutes Yield: 12 servings Category: Dessert, CakeThree Fun Twists on a Classic
This cake is wonderful as written. But you can play with it too. Try one of these fun spins for your next party. Each one adds a special touch of flavor.
Mint Chocolate Add one teaspoon of peppermint extract to the frosting. It tastes cool and fresh. Top with crushed candy canes or chocolate shavings. Chocolate Orange Add the zest of one orange to the cake batter. Use orange juice instead of milk in the frosting. The citrus brightens the rich chocolate. Salted Caramel Drizzle salted caramel sauce between the cake layers. Also swirl some into the frosting. The sweet and salty mix is irresistible. Which twist would you try first? Vote in the comments!Serving Your Chocolate Masterpiece
This cake stands tall all on its own. A few extras can make it a real event. Think about texture and temperature for contrast.
Serve a slice with fresh berries on the side. A scoop of vanilla ice cream is also perfect. For garnish, try a dusting of powdered sugar. A few chocolate curls look fancy but are easy. For drinks, cold milk is the classic choice. A cup of coffee pairs beautifully too. For a grown-up treat, try a glass of port wine. Its sweetness matches the deep cake. Which would you choose tonight: ice cream or berries?
Keeping Your Cake Fresh and Tasty
Store leftover cake covered at room temperature. It stays fresh for two days this way. For longer storage, use the fridge. The cold keeps the frosting firm for five days. My grandson loves a cold slice straight from the fridge.
You can freeze this cake for later. Wrap unfrosted layers tightly in plastic wrap. They keep well for up to three months. Thaw them overnight before you frost and serve. This is perfect for planning ahead for a party.
Why does this matter? A good storage plan prevents waste. You can enjoy every last crumb. Do you prefer cake cold or at room temperature? Tell me your favorite way to eat it.
Simple Fixes for Common Cake Troubles
Is your cake dry? Next time, check your bake time early. Overbaking is the usual culprit. A simple syrup brush can rescue a dry cake. Just mix equal parts sugar and water. Brush it on the layers before frosting.
Did your cake sink in the middle? The batter was likely under-baked. Or you may have opened the oven door too soon. Always test with a toothpick for doneness. Let the cake finish cooking fully.
Is your frosting too runny or too thick? Runny frosting needs more powdered sugar. Thick frosting needs a splash more milk. Add these slowly until the texture is right. Why this matters? Good frosting makes your cake look pro.
Your Chocolate Cake Questions Answered
Can I make this cake gluten-free? Yes, use a good gluten-free flour blend. Make sure it has xanthan gum in it. The swap should work perfectly here. How far ahead can I bake the layers? You can bake them two days early. Let them cool completely first. Wrap them well and keep them at room temperature. What is a good oil swap? You can use melted butter instead. It will give a slightly richer flavor. The cake will still be wonderfully moist. Can I cut this recipe in half? Absolutely. Bake it in a square eight-inch pan. Just watch the bake time, it will be less. What if I don’t have espresso powder? Just leave it out. The cake will still be delicious. The powder just makes the chocolate taste deeper.Share Your Chocolate Creation With Us
I hope this cake brings you great joy. Baking it should feel like a happy ritual. Seeing your finished masterpiece is the best part. I would love to see how yours turned out.
Share a photo of your slice and tag Savory Discovery on Pinterest. Your kitchen success stories make my day. Now, go enjoy that rich, chocolatey slice.


Matilda-Inspired Chocolate Layer Cake
Description
A rich and decadent chocolate layer cake inspired by the classic scene from Matilda.
Ingredients
For the Frosting:
Instructions
- Preheat your oven to 350°F (175°C). Grease and flour two 9-inch round cake pans.
- In a large bowl, whisk together the flour, sugar, cocoa powder, baking powder, baking soda, salt, and espresso powder (if using).
- In a separate bowl, whisk together the milk, vegetable oil, eggs, and vanilla extract until smooth.
- Pour the wet ingredients into the dry ingredients and stir until just combined.
- Carefully whisk in the boiling water until the batter is smooth. The batter will be thin.
- Divide the batter evenly between the prepared pans. Bake for 30-35 minutes, or until a toothpick inserted into the center comes out clean.
- Let the cakes cool completely in the pans.
- Make the frosting: Beat the softened butter until creamy. Gradually beat in the powdered sugar and cocoa powder. Mix in the vanilla extract and salt. Add the milk or cream, a little at a time, and beat until the frosting is fluffy and spreadable.
- Place one cooled cake layer on a plate. Spread a thick layer of frosting on top. Gently place the second cake layer on top. Frost the top and sides of the entire cake.


